Tuesday 6 October 2015

Lunar Eclipse and Harvest Moon

September 27 2015
 Lunar Eclipse during totality   
    
Nikon D610 + Skywatcher ED80
1 sec iso3200

Saturday 19 September 2015

Milky Way Panorama


 September 13 2015
8 image Panorama of the Milky Way (LRGB) Nikon D610 + Nikkor 50mm f1.8 @ 2.8
September 12, 2015 was a perfect night for stargazing. There was no moon, no wind and the skies are clear. I headed out to Pasqua Lake for a nights stay at our friends cabin and i thought i would like to do a proper field test for my Skywatcher StarAdventurer mount. Unlike my full size equatorial mount, the StarAdventurer is a no brainer when it comes to portability. At around 10 P.M, I headed out and did some static shots before polar aligning. Polar alignment was quick and easy. I really love the illuminated polar scope.  At first, I used my 14mm f2.8 lens but found out it was too wide to do a proper panorama without stretching the edges, good thing i had my 50mm f1.8 on my bag. I pointed the camera where the Milky Way is rising and manually aligned my field of view. After some test shots i thought i had the Milky Way centered. I started at the horizon and  worked my way up with a 5 minute exposure each.  There was still a bit of light pollution so i had to balance the ISO and exposure time and settled at ISO 800.


Before processing after stitching, horizon glow on the left
I used Photoshop CS6 to automatically stitch the images and did some quick color adjustments on Lightroom before importing it back to Photoshop.  There were lots of stars on the image and they obscure the details of the Milky Way so i removed some of them using the dust and scratches filter. I tried using the LRGB process and found out it was the best way to bring out the details for  shots with a bit of light pollution. A 5-minute shot has plenty of details  in it but remember that it increases the light pollution background as well. LRGB or Luminance +RGB (red, green,blue) is a process where you have a color data and a black & white data from the same image and you process them separately  and later on blend them together using the Luminosity blend mode on Photoshop . This gives you way more data to work on  the raw image files. I am still working on my image editing process for astrophotos, but  my field test for the StarAdventurer was pretty successful and I  would do a Milky Way panorama again under real dark skies...hopefully next summer.

Friday 18 September 2015

Pleiades (M45)


August 23 2015
(M45) The Pleiades Star Cluster taken from my light polluted backyard
The Pleiades
Nikon D610 + Skywatcher ED80
Skywatcher EQ-3 Synscan + Orion SS Autoguider 
5 minutes x 46 @ iso 400
Stacked in DeepSkyStacker

Monday 10 August 2015

Andromeda Galaxy first attempt with ED80

August 09 2015

M31 as photographed under light polluted skies
The Great Andromeda Galaxy (M31)
Nikon D610 + Skywatcher ED80
Skywatcher EQ-3 Synscan + Orion SS Autoguider 
3 minutes x 30 @ iso 1600 
Stacked in DeepSkyStacker


This is my first attempt to capture M31 under light polluted skies using the ED80. Trying to photograph galaxies from a red zone (light pollution is high) is nothing short of challenging and can be at times frustrating. After polar alignment and a 2-star calibration, i looked thru the 28mm eyepiece and saw M31 as a faint smudge.


M31 thru a 28mm eyepiece
M31 sits high enough at the horizon at this time of the year (August) but the light pollution just gets in the way, and the only way to capture all the faint details is thru a really dark sky, far away from city lights. I used a UHC-S filter for this image and i am suspecting that, although it minimizes light pollution, it also cuts some of M31's detail. 

The Andromeda galaxy is a very large object in the sky that its apparent diameter is six times that of a full moon, but it is so far away at 2.5 million light years that it's light is faint and will appear as a fuzzy star when viewed from earth.

M31 is as large as 6 full moons
My quest for a better imaging conditions of M31 will continue. The dark skies are calling...


Sunday 12 July 2015

Fire in the Sky

July 10 2015

Aurora
Aurora Borealis
Nikon D610 +Rokinon 14mm f2.8
30 secs ISO 3200  
 
The weekend trip down at Pasqua Lake with some friends turned out to be a great night. I purposely did not bring  my telescope rig this time since the skies looked a bit overcast with all the forest fires up in the North. The Milky Way was hardly popping out, with the low horizon so hazy that i decided its not worth spending time to photograph it. Then i received an aurora activity alert on my phone. Mother nature decided to put up a show that night. The sky lit up with shimmering waves of green and purple light.  I could hardly wait to start shooting as i climbed a nearby hill to have a better view. It was such a beautiful sight. With gentle warm breeze blowing, it was so quiet  as i sat there alone atop of the hill, looking up the stars and marveling how vast and beautiful our universe is.

Thursday 2 July 2015

Pinwheel Galaxy M101


June 21 2015
Pinwheel Galaxy
Nikon D610 + Skywatcher ED80
Skywatcher EQ-3 Synscan + Orion Autoguider 
10 minutes x 3 @ iso 1600 
Stacked in DeepSkyStacker

The Pinwheel Galaxy or Messier 101 is a spiral galaxy located at the constellation of Ursa Major, where the well known Big Dipper lies. During summer months, M101 is almost directly overhead . This image was taken at Cypress Hills Dark Sky Preserve without the use of any filters. I have tried using a UHC-S filter for this object but the resulting image was too dim even in dark skies. Imaging this faint galaxy under light polluted skies is almost impossible. You will like just get a blob of light, it's faint spiral arms will be extremely hard to resolve. A ten minute exposure @ISO 1600, the spiral arms became visible. Stacking three 10 minute exposure and more details can be seen. I am only limited by my telescope size as an 80mm scope is not really designed for targets this faint.

Sunday 28 June 2015

A closer look at Cygnus with 85mm f1.8


Deep Sky objects at Cygnus Constellation and some "air glow" not Aurora.


Nikon D610 + EQ-3 Sysncan mount
When humidity levels are too high after a thunderstorm, dew forming on the main objective of the scope is a major problem of any astro -imager.  And that is what exactly happened on my imaging session one night at Saskatchewans Cypress Hills Inter-provincial Park. So i have to pack up the scope and use a normal DSLR lens instead, mounted on a tracking mount i was still able to take pictures of the sky on a wider view. The Nikkor 85mm f1.8 lens proved to be an excellent astro lens. Corner sharpness are excellent even wide open and coma is very negligible. When used on a tracking mount, f1.8 is even too much. I had to stop down to f2.8 to avoid over exposure, or  just adjust the ISO but sometimes i can be lazy. =D

Thursday 25 June 2015

Cypress Hills Dark Sky Preserve


June 20 2015
The Lagoon Nebula (M8)
The Lagoon Nebula (M8) and Trifid Nebula (M20)
Nikon 610 + Skywatcher ED80
Skywatcher EQ-3 Synscan + Orion Autoguider 
10 minutes x 3 @ iso 3200 
Stacked in Photoshop

 Finally after weeks of waiting, i finally had another chance to re-visit a real dark sky preserve here in Western Canada, the Cypress Hills Inter-provincial Park. A four hour drive from the city, this park boasts one of the darkest skies in North America. We stayed for three nights but only on the last night i was able to get lucky when there was hardly any wind, cloud and the humidity was at acceptable levels. I wasted no time setting up my scope at the first sight of Polaris and at around 1 a.m when the Milky Way is high enough on the horizon, i slewed the scope towards the constellation of Sagittarius  and did a 10 minute initial exposure. I was elated with the results. The Lagoon Nebula stood out  clearly amidst the sea of stars on my camera screen.
I was able to take twenty more minutes of exposure for a total of thirty as i wanted to image other subjects before the skies get too light .

My Orion Starshoot Autoguider was working wonderfully that night, keeping my mount slow and steady. Dew became a problem later at around 2 a.m so i had to resort on using my wife's hair dryer on the main scope and autoguider.

It was an exhausting 3 days with hardly any sleep at night. The first day dew was such a big problem that i had to pack up the scope. The second night was still very wet with humidity but i had a fan heater to combat the dew, however my autoguider was going nuts that night. The third and last night was the best. Mother nature just cooperated.

This shot is a widefield shot of the  Lagoon Nebula or known as Messier 8 (M8) and on the upper right corner is the equally beautiful Trifid Nebula (M20).

Wednesday 17 June 2015

Milky Way at Rowans Ravine

June 13 2015
Milky Way, light pollution & a hint of aurora?

Milky Way
Nikon D7000 +Rokinon 14mm f2.8
30 secs x 11 @ iso 3200 
Stacked in Photoshop

Here is a shot of the Milky Way at Rowans Ravine Provincial Park last weekend. The problem in shooting within parks is that there will always be some sort of light pollution and our campsite was no exception, even though  it is decently dark enough for some astrophotography, . There was a streetlight ablaze right next to our tent and where my telescope is setup. So i roamed around the dark and found an open spot where the Milky Way is rising, it is a good spot albeit a couple of lights on the beach contributed to the already noticeable glow on the horizon. Then low clouds rolled in, and i thought i remembered receiving an aurora alert that night. But i couldn't see any noticeable auroral activity. When i was processing the pictures and stacking them later, i saw a faint green glow on the horizon and i thought that must be the aurora after all.


 June 13 2015
The Summer Triangle
Milky Way
Nikon D7000 +Rokinon 14mm f2.8
30 secs x 11 @ iso 3200 
Stacked in Photoshop

Here is another shot with a different play in white balance. The summer triangle stars Deneb on the left, Altair on bottom right and Vega on the top at almost overhead. They are seen as the brightest stars on this plane of the Milky Way at summer. There is that faint green glow again on the bottom.
Deneb is very interesting since it is surrounded with so much nebulosity and interstellar dust as seen here on a nearby star Sad'r  http://prairiepinoyastro.blogspot.ca/2015/06/baader-uhc-s-filter-first-impressions.html.

Next stop will be Cypress Hills. Now if only the weather will cooperate.

Sunday 14 June 2015

Weekend Camping at Rowans Ravine

  June 13 2015
Exploring the galaxy

It was a good weekend camping at Rowans Ravine, though our campsite was plagued by a nearby streetlight, still i was able to capture some decent images of the night sky. The real problem that night was not the clouds, or the cold temperature nor the wind. It was the dew! Yes dew is major enemy of any observer,. In less than an hour after my rig is up and running, dew started to form on the main scope and on the guide scope. I heard the pings of the guiding software complaining of losing the guide star. I checked, the skies were clear, not a cloud in sight. When i check the main objective, it was dripping wet with dew. The humidity was so high that night that i had no choice but to pack and and go to sleep. Less than 10 decent images were taken and that was it. Though it was stll fun,. I had a great time just looking up and watching the Milky Way rise.

 June 13 2015
Milky Way over the campsite

Thursday 11 June 2015

Veil Nebula


June 6 2015
The Western Veil (also known as Caldwell 34)

Western Veil Nebula
Nikon D610 +Skywatcher ED80 + Orion Starshoot Autoguider
Skywatcher EQ-3 Synscan
5 mins x 7 @ iso 800 with Baader UHC-S.
Stacked in DSS + Photoshop

Here is another celestial object taken from my light polluted backyard. The Veil Nebula is a supernova remnant which occurred thousands of years ago. This nebula is so large that it is measured at six times the diameter of the full moon, but it is very diffuse. What is pictured here is just the western veil or called the Witches Broom which is less than a quarter of the size of the whole nebula. The veil is part of the Cygnus loop within the plane of the Milky Way. The bright star is called 52 Cyg.
I had a hard time processing this image partly because the nebula is so faint that even at 5 mins exposure i can  hardly see it and i suspect my ISO is too low at 800. The UHC filter however helped a lot reducing the skyglow which makes the image look orange.
Stretching the image introduced a lot of noise and artifacts but i was able to bring out the green color of Oxygen III emission which this nebula is known for. Making more adjustments on the midtone levels will bring out some more wispy details but the image will be degraded too much. I will definitely try to capture this object again on the next chance that will come.

Wednesday 10 June 2015

Baader UHC-S Filter first impressions


May 30 2015
Baader Planetarium 2 inch UHC-S Filter

It was the weekend once again and just in time, i received my broadband nebula filter. The filter coating is mirror or metallic like with a tint of magenta and cyan. It is supposed to increase the contrast by blocking certain spectrum of light especially those coming from high pressure sodium streetlights, while allowing Hydrogen alpha and Oxygen III emissions to pass including most of the major parts of visible spectrum .
I headed out to a dark sky just an hour's drive away from the city to test it.


 May 30 2015
Sadir region
I decided to try the star Sadir as it is surrounded by clouds of ionized hydrogen as shown on a handy Android app called Stellarium.
 Here is a single 5 minute sub straight from the camera with the filter.
D610 ISO 1600 
The filter did a good job of darkening the sky without blocking most of the starlight. And the stars looked a bit smaller and sharper by reducing their brightness for a bit.
As you can see, the red hydrogen emission from the nebula is starting to show up, though is still restricted by the stock IR filter on the sensor of the camera.  
But the results are quite promising.
 
  May 30 2015
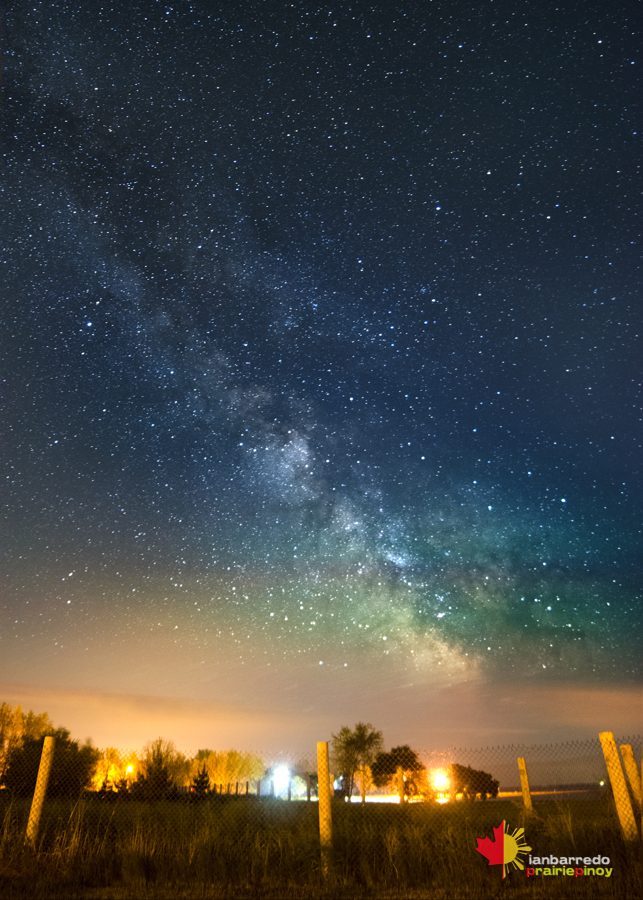
The Great Rift at Sadir
The Great Rift of the Milky Way at Sadir
Nikon D610 +Skywatcher ED80 + Orion Starshoot Autoguider
Skywatcher EQ-3 Synscan
5 mins x 13 @ iso 1600 with Baader UHC-S.
Stacked in DSS + Photoshop

After stacking in DSS and stretching the image in Photoshop, the Great Rift of the Milky Way is clearly visible. It is here on this region that our Milky Way is seemed to be divided in the middle by these clouds of hydrogen gas and dust.

I was happy with these results, although the signal to noise ratio still needs to be improved as it requires a lot of processing or "image stretching" in Photoshop thru curves and levels and as a result there is a lot of noise. And with some noise reduction, most of the fine details of the nebula are gone. But i am quite impressed by the dynamic range of the D610 sensor as you can still recover a lot of data. The star diffraction spikes are added just for aesthetic reasons. Refractor telescopes are unable to create this side effect native to reflecting telescopes.

Tuesday 9 June 2015

First Light with the ED80

May 10 2015
The Ring Nebula (M57)
Nikon D610 +Skywatcher ED80 + Orion Starshoot Autoguider
Skywatcher EQ-3 Synscan
5 mins x 15 @ iso 500 with no filter.
DSS + Photoshop

First light with the ED80 was actually the moon obviously, since it is an easy target for a beginner,  but the moon doesn't count as a deep space object. And so even with a half moon, after a long and laborious process of polar alignment, i think i have nailed it that time because the GOTO accuracy was spot on.
I slewed the scope towards the Ring Nebula on the constellation Lyra and it popped right on the center of the image after the first test shot.

I didn't expect to see anything spectacular but i was able to see the doughnut shaped nebula even with light pollution, the colors blue and red can be clearly seen. I was elated!


May 10 2015
Dumbbell Nebula (M27)
Nikon D610 +Skywatcher ED80 + Orion Starshoot Autoguider
Skywatcher EQ-3 Synscan
5 mins x 9 @ iso 640 with no filter.
DSS + Photoshop

With just a few hours to spare before dawn breaks in, i slewed the scope towards the nearby Dumbbell Nebula at the constellation Vulpecula within the Milky Way. The processed image was a bit more gratifying for me since the Dumbbell Nebula is much bigger than the Ring Nebula.


It was a successful first light for the telescope, and the EQ-3 mount did its job fairly good.


Monday 8 June 2015

First DSO

First Deep Sky Object using DSLR + fixed tripod
The Great Andromeda Galaxy (M31)
Andromeda Galaxy
Nikon D610 + AF-S Nikkor 70-300 VRII
DSS + Photoshop

I actually took my first DSO (deep space object) last September 2014 from my backyard using a standard DSLR setup on a fixed tripod. Exposure was 5 secs @ iso 3200 x 30 shots. Stacked in Deep Sky Stacker and processed in photoshop. The end result was horrible but it actually gave me hope on what a proper telescope and a tracking mount might be able to do, given these results from a fixed setup. It was a good test of equipment. I was able to bring out just a tiny bit of the dust lane detail and i can see the smaller satellite galaxy just above it called M32.

M31 is easy to spot during the fall when it can be seen easily almost overhead.
Milky Way with M31
Here is a shot of the Milky way from a semi dark sky last September 2014. M31 can be seen as fuzzy blob of light amongst the sea of stars.

Backyard Astrophotography

Why Astrophotography?

My interest on night sky did not come on all of a sudden. In fact I can remember as a kid, I would look up at the heavens and wonder what's up there. And many years later, I almost bought a telescope during my first job abroad. Then came photography as a hobby, I was into all sorts of it. But my fascination of the heavens did not go away. It just went into dormancy.
Fast forward to the present, here I am finally settled on another country.  In western Canada, camping is popular during summer, and on the summer of 2014 we booked into a campsite that had a "Star Party" on our camping dates. I have no idea what a star party was. It turned out to be a convention of amateur astronomers, astrophotographers and everybody else that has an interest of the night sky. I saw their equipment, i went into one of the indoor presentations, saw the images and that was it. I was hooked already.
Then i said to myself, i need a telescope by the next summer. I would use the telescope not to observe but to photograph objects in the night sky.

Came spring of 2015.

Finally after much research, I decided that a perfect beginner scope is an 80mm refractor. The Skywatcher ED80 Black Diamond looks very promising. The scope has a 600mm focal length and f7.5 f-ratio.  Telescopes differ from camera lenses when it comes to f-ratio. 80mm is diameter of the main optics. 600mm is the focal length. 600/80 and you get f7.5 which makes it a medium "fast" telescope.


Skywatcher ED80 kit
The scope comes with  all the accessories for visual use such as 50mm finder scope, and 28mm 2 inch eyepiece. I was surprised when i first looked at the eyepiece. The views are wide and bright. A viewfinder of a full frame camera is very dim compared to the views offered through this eyepiece. Suddenly you can see a lot of stars even in a light polluted sky.
Other imaging accessories such as a T-ring for DSLR attachment is bought separately.


APO 80mm doublet fully multi-coated optics.
This model is equipped with  premium optics such as an ED glass, just like most modern camera lenses.

I ordered a fully functional system, one that is all set to go. And the mount is more important than the telescope. The Skywatcher EQ3 Synscan is a good starter mount and very portable too., but the mount is limited to 5 kgs for imaging and 7 kgs for visual use, the ED80 + DSLR & accesories is just right for the maximum payload so i cannot use the mount on more heavier telescopes.


EQ3 Synscan Equatorial mount


Synscan Micro computer
The EQ3 is  a German equatorial mount with GOTO and tracking capabilities. GOTO is just short for "go to" which means you select a star, push a button and the telescope will go to or point itself on the target. It's actually more complicated than it sounds.

Hand controller with GPS
The hand controller lets you select over 40,000 objects currently available on the night sky. But in order for it to be accurate, you need an almost perfect polar alignment and a good star alignment.


Orion Starshoot Autoguider.
One essential accessory for a successful astrophotography is an auto-guider. In fact it is a must. More on auto-guiding later.


The EQ3 + ED80 combo is just a perfect balance between portability and the ability to image long exposures at 600mm focal length without star trailing, that is though with active guiding. I have successfully tried unguided for 3 minutes without star trailing but that was with excellent polar alignment, and that is something that comes as a hit and miss sometimes.

I shall document all the imaging process here as I am learning the curve and will be posting the
images taken with this system.