Monday, 29 February 2016

Chasing Orion Part 3


February 26, 2016
Flame Nebula and Horsehead Nebula
 Nikon D5300A, Skywatcher ED80  + Baader UHC-S filter 
+ 0.85x Focal Reducer/Corrector
Skywatcher EQ-3 Synscan, guided, ISO 400 5 mins  x 7


..and still chasing Orion. Last Friday night, February 26 was the warmest night ever! It was a warm +5C or so and hardly any wind. The skies were clear and I thought I would give a proper field test for my new D5300A, modified by LifePixel USA. So I brought down all the gear, and slewed the ED80 on Alnitak, the southernmost star on Orions Belt. Alnitak contains one of the most beautiful nebula's in the night sky, not to mention The Great Orion Nebula itself. Problem is I only have less than an hour of imaging time, before Orion is goes behind my neighbors rooftops. But it gave me an idea how the D5300A performed.


 Here is a comparison shot, although the sky conditions might not be exactly the same as there was a rising moon when i took the shot using the D610, but still one can see the big difference of using a modified camera. The horsehead is particularly difficult as it is quite dim. Though I would admit the the low noise capability of the D610 is superior to the cropped sensor D5300.


Response curve of the modified D5300. Red line indicates the stock filter, typical for most modern DSLRs. The H-alpha (teal color) is only at 20% or so. The new filter (blue) has the H-alpha sensitivity up to 98%.  (Graph is taken from another source)


 Monochrome version. I kinda liked this one. It gives me a sense of a vast lonely but beautiful space.



Monday, 8 February 2016

Chasing Orion Part 2

January 30, 2016
The Great Orion Nebula  (M42)  &  The Running Man Nebula

 Nikon D7000, Skywatcher ED80 ISO 400  + Baader UHC-S filter
Skywatcher EQ-3 Synscan, guided
3 mins x 25, 30 secs x 2

...and so the chase continues. We got a bit of a mild weather one weekend (at -6C) and  i finally decided to give it a try. It might be now or never. The night was not so cold but with the windchill it feels like -12C. Orion is not so "accessible" from my backyard. It doesn't rise high enough and by 10PM it is hidden behind my neighbors rooftops. I have small spot that I can position my scope in plain view of Polaris at at the same time be able to see Orion. So I carried all my gear down and set it up by the garage. Setup time, polar alignment and calibration ate up 30 minutes of my precious time and I only managed to acquire 1 hour and 40 minutes of data before my guiding program went "ding-ding-ding-ding!" I checked visually and there, my target  is already lost behind the rooftops. Well, I was happy with the results at the very least, but it could have been better.  I was able to image Orion from my backyard and from the looks of it, there might be no other place. 

Skywatcher ED80 with my homemade dew heaters.

Laptop running PHD guiding on my garage

Here is a comparison : straight  out of camera, after stacking 25 photos in DeepSkyStacker (including calibration files), and final adjustment in Photoshop

Not too bad considering my light polluted skies and my trusted old D7000. I have to limit my exposure time just enough to balance my signal with the light pollution. Too short and  I will not  have enough data to process, too long and well, it will overexpose.  Might be too hard to recover in post processing. I settled for 30 secs on the core, as it  can easily blow out,  and  3 minutes for the  rest of the nebula. It is interesting to note that the reflection nebula on the top of Orion ( Running Man Nebula) is almost absent on the RAW file and takes form only after stacking. But  I have this mistake that my stars are a bit out of focus.  I  can be forgiven, to think that it is not so easy to focus a telescope when it feels like -12C and your hands are frozen and stiff....

Monday, 25 January 2016

Chasing Orion (Arayat, Pampanga Philippines)

The Orion Constellation  widefield shot
 Nikon D610, Nikkor 85mm f1.8 @ f4 ISO 800
SkyWatcher StarAdventurer
 Total exposure = 2 minutes x 16

For the longest time, I have been chasing Orion like mad.  Here in Canada,  (Northern Hemisphere) Orion is visible high enough on the horizon when it starts to be -10 to -30 outside, meaning it comes out when its the dead of winter.  You just can't do proper imaging on those of temperatures.
Chasing this beautiful constellation led me to Arayat Pampanga , during our 2015 Christmas vacation, where the skies are pretty dark. I was actually surprised how dark the skies there, on a clear night you can see all the stars  with very minimal light pollution. I checked my star app, and yes Orion comes out high at around 9PM!
For a month long vacation, I thought I will have plenty of time for astrophotography but as nature calls the shots, I only got 1 window of opportunity, the image above is supposedly just a 25 minute "field test" for my star tracker...before  I was called back from the rice fields as snakes tend to go out at night.
Then i never got the chance again. There was the rain, the flood, and on my last day where the night was perfectly clear,  I left my camera bag back at my hometown.
I just stared at the starry sky almost in tears. But the test shot turned out to be ok as i was able to capture most of the deep sky objects
 
The Stars of Orion (darn clouds started rolling in on the right)
 Betelgeuse and  Rigel are one of the brightest stars in the night sky.

 
 Orion Shines!  Just how clear the skies are in Arayat
1x30 secs@ ISO800 85mm  f1.8@f4

Tuesday, 6 October 2015

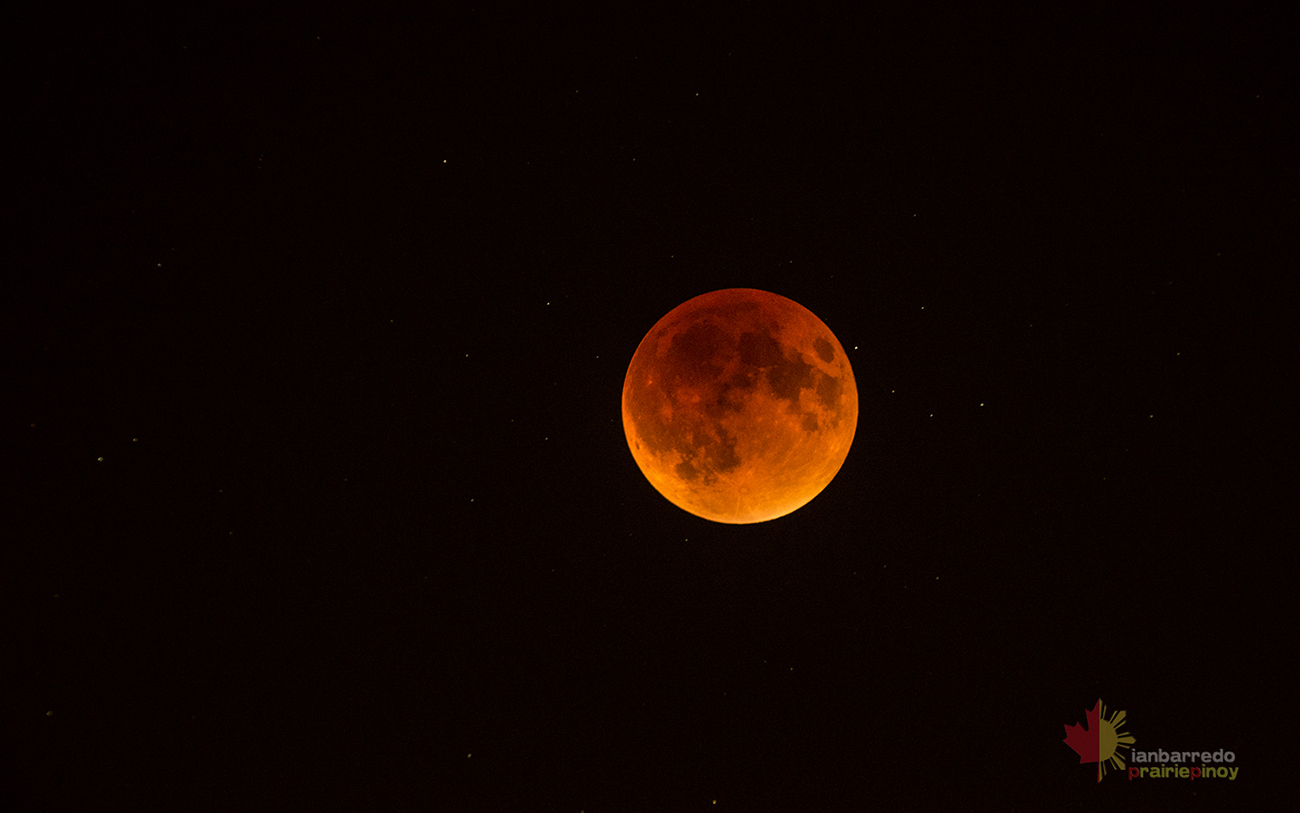
Lunar Eclipse and Harvest Moon

September 27 2015
 Lunar Eclipse during totality   
    
Nikon D610 + Skywatcher ED80
1 sec iso3200

Saturday, 19 September 2015

Milky Way Panorama


 September 13 2015
8 image Panorama of the Milky Way (LRGB) Nikon D610 + Nikkor 50mm f1.8 @ 2.8
September 12, 2015 was a perfect night for stargazing. There was no moon, no wind and the skies are clear. I headed out to Pasqua Lake for a nights stay at our friends cabin and i thought i would like to do a proper field test for my Skywatcher StarAdventurer mount. Unlike my full size equatorial mount, the StarAdventurer is a no brainer when it comes to portability. At around 10 P.M, I headed out and did some static shots before polar aligning. Polar alignment was quick and easy. I really love the illuminated polar scope.  At first, I used my 14mm f2.8 lens but found out it was too wide to do a proper panorama without stretching the edges, good thing i had my 50mm f1.8 on my bag. I pointed the camera where the Milky Way is rising and manually aligned my field of view. After some test shots i thought i had the Milky Way centered. I started at the horizon and  worked my way up with a 5 minute exposure each.  There was still a bit of light pollution so i had to balance the ISO and exposure time and settled at ISO 800.


Before processing after stitching, horizon glow on the left
I used Photoshop CS6 to automatically stitch the images and did some quick color adjustments on Lightroom before importing it back to Photoshop.  There were lots of stars on the image and they obscure the details of the Milky Way so i removed some of them using the dust and scratches filter. I tried using the LRGB process and found out it was the best way to bring out the details for  shots with a bit of light pollution. A 5-minute shot has plenty of details  in it but remember that it increases the light pollution background as well. LRGB or Luminance +RGB (red, green,blue) is a process where you have a color data and a black & white data from the same image and you process them separately  and later on blend them together using the Luminosity blend mode on Photoshop . This gives you way more data to work on  the raw image files. I am still working on my image editing process for astrophotos, but  my field test for the StarAdventurer was pretty successful and I  would do a Milky Way panorama again under real dark skies...hopefully next summer.

Friday, 18 September 2015

Pleiades (M45)


August 23 2015
(M45) The Pleiades Star Cluster taken from my light polluted backyard
The Pleiades
Nikon D610 + Skywatcher ED80
Skywatcher EQ-3 Synscan + Orion SS Autoguider 
5 minutes x 46 @ iso 400
Stacked in DeepSkyStacker

Monday, 10 August 2015

Andromeda Galaxy first attempt with ED80

August 09 2015

M31 as photographed under light polluted skies
The Great Andromeda Galaxy (M31)
Nikon D610 + Skywatcher ED80
Skywatcher EQ-3 Synscan + Orion SS Autoguider 
3 minutes x 30 @ iso 1600 
Stacked in DeepSkyStacker


This is my first attempt to capture M31 under light polluted skies using the ED80. Trying to photograph galaxies from a red zone (light pollution is high) is nothing short of challenging and can be at times frustrating. After polar alignment and a 2-star calibration, i looked thru the 28mm eyepiece and saw M31 as a faint smudge.


M31 thru a 28mm eyepiece
M31 sits high enough at the horizon at this time of the year (August) but the light pollution just gets in the way, and the only way to capture all the faint details is thru a really dark sky, far away from city lights. I used a UHC-S filter for this image and i am suspecting that, although it minimizes light pollution, it also cuts some of M31's detail. 

The Andromeda galaxy is a very large object in the sky that its apparent diameter is six times that of a full moon, but it is so far away at 2.5 million light years that it's light is faint and will appear as a fuzzy star when viewed from earth.

M31 is as large as 6 full moons
My quest for a better imaging conditions of M31 will continue. The dark skies are calling...